阅读约 14 分钟
6830 字
1、基本理解和使用
函数式组件
 1
 2
 3
 4
 5
 6
 7
 8
 9
10
11
12
13
14
15
16
17
18
19
20
21
22
23
24
25
26
27
28
29
|
<html lang="en">
  <head>
    <meta charset="UTF-8" />
    <meta http-equiv="X-UA-Compatible" content="IE=edge" />
    <meta name="viewport" content="width=device-width, initial-scale=1.0" />
    <title>函数式组件</title>
  </head>
  <body>
    <div id="test"></div>

    <!-- 引入核心库 -->
    <script src="../js/react.development.js"></script>
    <!-- 引入react-dom -->
    <script src="../js/react-dom.development.js"></script>
    <!-- 引入babel -->
    <script src="../js/babel.min.js"></script>

    <!-- 此处一定写babel -->
    <script type="text/babel">
      // 1.创建函数式组件
      function MyComponent() {
        return <h2>我是用函数定义的组件(适用于【简单组件】的定义)</h2>
      }

      // 2.渲染组件到页面
      ReactDOM.render(<MyComponent />, document.getElementById('test'))
    </script>
  </body>
</html>
|
类式组件
 1
 2
 3
 4
 5
 6
 7
 8
 9
10
11
12
13
14
15
16
17
18
19
20
21
22
23
24
25
26
27
28
29
30
31
|
<html lang="en">
  <head>
    <meta charset="UTF-8" />
    <meta http-equiv="X-UA-Compatible" content="IE=edge" />
    <meta name="viewport" content="width=device-width, initial-scale=1.0" />
    <title>函数式组件</title>
  </head>
  <body>
    <div id="test"></div>

    <!-- 引入核心库 -->
    <script src="../js/react.development.js"></script>
    <!-- 引入react-dom -->
    <script src="../js/react-dom.development.js"></script>
    <!-- 引入babel -->
    <script src="../js/babel.min.js"></script>

    <!-- 此处一定写babel -->
    <script type="text/babel">
      // 1.创建类式组件
      class MyComponent extends React.Component {
        render() {
          return <h2>我是用类定义的组件(适用于【复杂组件】的定义)</h2>
        }
      }

      // 2.渲染组件到页面
      ReactDOM.render(<MyComponent />, document.getElementById('test'))
    </script>
  </body>
</html>
|
2、State
-
state是组件对象最重要的属性, 值是对象(可以包含多个key-value的组合)
-
组件被称为"状态机", 通过更新组件的state来更新对应的页面显示(重新渲染组件)
-
组件中render方法中的this为组件实例对象
-
组件自定义的方法中this为undefined,如何解决?
- 强制绑定this: 通过函数对象的bind()
- 箭头函数
-
状态数据,不能直接修改或更新 ,用setState更新,是合并的动作
 1
 2
 3
 4
 5
 6
 7
 8
 9
10
11
12
13
14
15
16
17
18
19
20
21
22
23
24
25
26
27
28
29
30
31
32
33
34
35
|
<!-- 此处一定写babel -->
<script type="text/babel">
	// 1.创建类式组件
	class MyComponent extends React.Component {
	  constructor(props) {
	    super(props)
	    // 初始化状态
	    this.state = {
	      isHot: true,
	    }
	    // 类组件获取this指向当前组件的方法一:将changeWeather绑定上this后生成新的方法重新赋值给changeWeather
	    this.changeWeather = this.changeWeather.bind(this)
	  }

	  render() {
	    return (
	      <h2 onClick={this.changeWeather}>
	        今天天气很{this.state.isHot ? '炎热' : '凉爽'}
	      </h2>
	    )
	  }

	  //changeweather放在哪里?——Weather的原型对象上,供实例使用
	  //由于changeleather是作为onClick的回调,所以不是通过实例调用的,是直接调用
	  //类中的方法默认开启了局部的严格模式,所以changeweather中的this为undefined
	  changeWeather() {
	    // 严重注意,state不可以直接更改,比如以下
	    // this.state.isHot = !this.state.isHot
	    this.setState({ isHot: !this.state.isHot })
	  }
	}

	// 2.渲染组件到页面
	ReactDOM.render(<MyComponent />, document.getElementById('test'))
</script>
|
-
setState引起组件的后续动作是异步的!!!!!!
精简代码写法
 1
 2
 3
 4
 5
 6
 7
 8
 9
10
11
12
13
14
15
16
17
18
19
20
21
22
23
24
|
<!-- 此处一定写babel -->
<script type="text/babel">
  // 1.创建类式组件
  class MyComponent extends React.Component {
    // 初始化状态
    state = { isHot: true }

    render() {
      return (
        <h2 onClick={this.changeWeather}>
          今天天气很{this.state.isHot ? '炎热' : '凉爽'}
        </h2>
      )
    }

    // 自定义方法:赋值语句+箭头函数
    changeWeather = () => {
      this.setState({ isHot: !this.state.isHot })
    }
  }

  // 2.渲染组件到页面
  ReactDOM.render(<MyComponent />, document.getElementById('test'))
</script>
|
2.1、setState
setState更新状态的2种写法
对象式的setState
setState(stateChange, [callback])
- stateChange为状态改变对象(该对象可以体现出状态的更改)
- callback是可选的回调函数, 它在状态更新完毕、界面也更新后(render调用后)才被调用
 1
 2
 3
 4
 5
 6
 7
 8
 9
10
11
12
13
14
15
16
17
18
19
20
21
22
23
|
import React, {Component} from 'react'

export default class Demo extends Component {
  state = {count: 0}

  add = () => {
    const {count} = this.state
    // 更新状态
    this.setState({count: count + 1}, () => {
      // 改完状态、render执行完的回调
      console.log(this.state.count)
    })
  }

  render() {
    return (
      <div>
        <h1>当前求和为:{this.state.count}</h1>
        <button onClick={this.add}>点我+1</button>
      </div>
    )
  }
}
|
函数式的setState
setState(updater, [callback])
- updater为返回stateChange对象的函数
- updater可以接收到state和props
- callback是可选的回调函数, 它在状态更新、界面也更新后(render调用后)才被调用
 1
 2
 3
 4
 5
 6
 7
 8
 9
10
11
12
13
14
15
16
17
18
19
20
21
22
23
24
25
26
27
28
29
30
31
32
|
import React, {Component} from 'react'

export default class Demo extends Component {
  state = {count: 0}

  add = () => {
    // 对象式的setState
    // const {count} = this.state
    // // 更新状态
    // this.setState({count: count + 1}, () => {
    //   // 改完状态、render执行完的回调
    //   console.log(this.state.count)
    // })

    // 函数式setState
    this.setState((state, props) => {
      return {count: state.count + 1}
    }, () => {
      // 改完状态、render执行完的回调
      console.log(this.state.count)
    })
  }

  render() {
    return (
      <div>
        <h1>当前求和为:{this.state.count}</h1>
        <button onClick={this.add}>点我+1</button>
      </div>
    )
  }
}
|
总结
- 对象式的setState是函数式的setState的简写方式(语法糖)
- 使用原则:
- 如果新状态不依赖于原状态 ===> 使用对象方式
- 如果新状态依赖于原状态 ===> 使用函数方式
- 如果需要在setState()执行后获取最新的状态数据,要在第二个callback函数中读取
3、props
- props是只读的
- 标签体的内容也是可以通过props中的children属性拿到,是一种特殊的标签属性
3.1、基本使用
 1
 2
 3
 4
 5
 6
 7
 8
 9
10
11
12
13
14
15
16
17
18
19
20
|
<!-- 此处一定写babel -->
<script type="text/babel">
  class Person extends React.Component {
    render() {
      return (
        <ul>
          <li>作者:{this.props.name}</li>
          <li>性别:{this.props.sex}</li>
          <li>年龄:{this.props.age}</li>
        </ul>

    }
  }

  // 2.渲染组件到页面
  ReactDOM.render(
    <Person name="tom" age="18" sex="女" />,
    document.getElementById('test')
  )
</script>
|
3.2、批量传递props
 1
 2
 3
 4
 5
 6
 7
 8
 9
10
11
12
13
14
15
16
17
18
|
<!-- 此处一定写babel -->
<script type="text/babel">
  class Person extends React.Component {
    render() {
      return (
        <ul>
          <li>作者:{this.props.name}</li>
          <li>性别:{this.props.sex}</li>
          <li>年龄:{this.props.age}</li>
        </ul>
      )
    }
  }

  // 2.渲染组件到页面
  const p = {name: '老刘', age:18, sex: '女'}
  ReactDOM.render(<Person {...p} />, document.getElementById('test'))
</script>
|
3.3、对props传值做类型限制
 1
 2
 3
 4
 5
 6
 7
 8
 9
10
11
12
13
14
15
16
17
18
19
20
21
22
23
24
25
26
27
28
29
30
31
32
33
34
35
36
37
38
39
40
41
42
43
|
<body>
  <div id="test"></div>

  <!-- 引入核心库 -->
  <script src="../js/react.development.js"></script>
  <!-- 引入react-dom -->
  <script src="../js/react-dom.development.js"></script>
  <!-- 引入babel -->
  <script src="../js/babel.min.js"></script>
  <!-- 引入prop-types -->
  <script src="../js/prop-types.js"></script>

  <!-- 此处一定写babel -->
  <script type="text/babel">
    class Person extends React.Component {
      render() {
        return (
          <ul>
            <li>作者:{this.props.name}</li>
            <li>性别:{this.props.sex}</li>
            <li>年龄:{this.props.age}</li>
          </ul>
        )
      }
    }

    // 设置入参格式
    Person.propTypes = {
      // 限制只能字符串,且必传
      name: PropTypes.string.isRequired,
      age: PropTypes.number,
    }

    // 设置默认值
    Person.defaultProps = {
      sex: '无',
    }

    // 2.渲染组件到页面
    const p = { name: '老刘', age: 18, sex: '女' }
    ReactDOM.render(<Person {...p} />, document.getElementById('test'))
  </script>
</body>
|
props简写:
 1
 2
 3
 4
 5
 6
 7
 8
 9
10
11
12
13
14
15
16
17
18
19
20
21
22
23
24
25
26
27
28
29
|
<script type="text/babel">
  class Person extends React.Component {
    // 设置入参格式
    static propTypes = {
      // 限制只能字符串,且必传
      name: PropTypes.string.isRequired,
      age: PropTypes.number,
    }

    // 设置默认值
    static defaultProps = {
      sex: '无',
    }

    render() {
      return (
        <ul>
          <li>作者:{this.props.name}</li>
          <li>性别:{this.props.sex}</li>
          <li>年龄:{this.props.age}</li>
        </ul>
      )
    }
  }

  // 2.渲染组件到页面
  const p = { name: '老刘', age: 18, sex: '女' }
  ReactDOM.render(<Person {...p} />, document.getElementById('test'))
</script>
|
3.4、函数式组件使用props
 1
 2
 3
 4
 5
 6
 7
 8
 9
10
11
12
13
14
15
16
17
18
|
<script type="text/babel">
  // 1.创建函数式组件
  function Person(props) {
    return (
      <ul>
        <li>作者:{props.name}</li>
        <li>性别:{props.sex}</li>
        <li>年龄:{props.age}</li>
      </ul>
    )
  }

  // 2.渲染组件到页面
  ReactDOM.render(
    <Person name="jery" age={18} sex="女" />,
    document.getElementById('test')
  )
</script>
|
4、refs
4.1、字符串形式的ref(过时)
 1
 2
 3
 4
 5
 6
 7
 8
 9
10
11
12
13
14
15
16
17
18
19
20
21
22
23
24
25
26
|
<script type="text/babel">
// 创建组件
class Demo extends React.Component{
showData = () => {
alert(this.refs.input1.value)
}
showData2 = () => {
const {input2} = this.refs
alert(input2.value)
}
render() {
return (
<div>
<input ref="input1" type="text" placeholder="点击按钮提示数据" />
<button ref="button1" onClick={this.showData}>点我提示左侧数据</button>
<input ref="input2" onBlur={this.showData2} type="text" placeholder="失去焦点提示数据" />
</div>
)
}
}
// 2.渲染虚拟dom到页面
ReactDOM.render(<Demo/>, document.getElementById('test'))
</script>
|
4.2、回调形式的ref
- 如果ref回调函数是以内联函数的方式定义的,在更新过程中它会被执行两次,第一次传入参数null,然后第二次会传入参数DOM元素。这是因为在每次渲染时会创建一个新的函数实例,所以React 清空旧的ref并且设置新的。通过将ref的回调函数定义成class的绑定函数的方式可以避免上述问题,但是大多数情况下它是无关紧要的。
 1
 2
 3
 4
 5
 6
 7
 8
 9
10
11
12
13
14
15
16
17
18
19
20
21
22
23
24
25
26
27
28
29
30
31
32
|
<script type="text/babel">
// 创建组件
class Demo extends React.Component{
showData = () => {
alert(this.input1.value)
}
showData2 = () => {
const {input2} = this
alert(input2.value)
}
render() {
return (
<div>
{/* 内联回调函数方式获取ref */}
<input ref={currentNode => this.input1 = currentNode} type="text" placeholder="点击按钮提示数据" />
<button onClick={this.showData}>点我提示左侧数据</button>
<input ref={this.saveInput} onBlur={this.showData2} type="text" placeholder="失去焦点提示数据" />
</div>
)
}
// class的绑定函数设置ref
saveInput = (currentNode) => {
this.input2 = currentNode
}
}
// 2.渲染虚拟dom到页面
ReactDOM.render(<Demo/>, document.getElementById('test'))
</script>
|
4.3、createRef使用
 1
 2
 3
 4
 5
 6
 7
 8
 9
10
11
12
13
14
15
16
17
18
19
20
21
22
23
24
|
<script type="text/babel">
// 创建组件
class Demo extends React.Component{
// React.createRef调用后可以返回一个容器,该容器可以存储被ref所标识的节点
// 但是该容器是专用的,只能放在一个标签上
myRef = React.createRef()
showData = () => {
alert(this.myRef.current.value)
}
render() {
return (
<div>
<input ref={this.myRef} type="text" placeholder="点击按钮提示数据" />
<button onClick={this.showData}>点我提示左侧数据</button>
</div>
)
}
}
// 2.渲染虚拟dom到页面
ReactDOM.render(<Demo/>, document.getElementById('test'))
</script>
|
5、事件处理
- 通过onXxx属性指定事件处理函数(注意大小写)
- React使用的是自定义(合成)事件, 而不是使用的原生DOM事件
- React中的事件是通过事件委托方式处理的(委托给组件最外层的元素)
- 通过event.target得到发生事件的DOM元素对象
 1
 2
 3
 4
 5
 6
 7
 8
 9
10
11
12
13
14
15
16
17
18
19
20
21
22
23
24
25
26
27
28
|
<script type="text/babel">
// 创建组件
class Demo extends React.Component{
// 创建ref容器
myRef = React.createRef()
showData = () => {
alert(this.myRef.current.value)
}
showData2 = (event) => {
alert(event.target.value)
}
render() {
return (
<div>
<input ref={this.myRef} type="text" placeholder="点击按钮提示数据" />
<button onClick={this.showData}>点我提示左侧数据</button>
<input onBlur={this.showData2} type="text" placeholder="失去焦点提示数据" />
</div>
)
}
}
// 2.渲染虚拟dom到页面
ReactDOM.render(<Demo/>, document.getElementById('test'))
</script>
|
6、高阶函数与函数柯里化
- 高阶函数:如果一个函数符合下面2个规范中的任何一个,那该函数就是高阶函数
- 若A函数,接收的参数是一个函数,那么A就可以称之为高阶函数
- 若A函数,调用的返回值依然是一个函数,那么A就可以称之为高阶函数
- 函数的柯里化:通过函数调用继续返回函数的方式,实现多次接收参数最后统一处理的函数编码形式
用函数柯里化实现:
 1
 2
 3
 4
 5
 6
 7
 8
 9
10
11
12
13
14
15
|
saveFormData = (dataType) => {
	return (event) => {
		this.setstate({[dataType]: event.target.value})
	}
}

render(){
	return(
		<form onSubmit={this.handleSubmit}>
			用户名:<input onChange={this.saveFormData('username')} type="text" name="username"/>
			密码:<input onChange={this.saveFormData('password')} type="password" name="password"/>
			<button>登录</button>
		</form>
	)
}
|
不用函数柯里化实现:
 1
 2
 3
 4
 5
 6
 7
 8
 9
10
11
12
13
14
|
//保存表单数据到状态中
saveFormData = (dataType,event)=>{
	this.setState({[dataType]:event.target.value})
}

render(){
	return(
		<form onSubmit={this.handleSubmit}>
			用户名:<input onChange={event => this.saveFormData('username',event) } type="text" name="username"/>
			密码:<input onChange={event => this.saveFormData('password',event) } type="password" name="password"/>
			<button>登录</button>
		</form>
	)
}
|
7、组件的生命周期
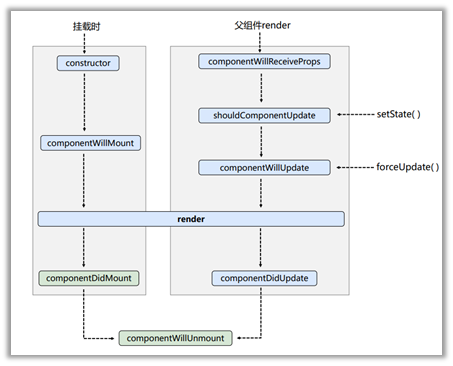
7.1、生命周期流程图(旧)
 生命周期流程图(旧)
- 初始化阶段: 由ReactDOM.render()触发—初次渲染
- constructor()
- componentWillMount()
- render()
- componentDidMount()
- 更新阶段: 由组件内部this.setSate()或父组件重新render触发
- shouldComponentUpdate()
- componentWillUpdate()
- render()
- componentDidUpdate()
- 卸载组件: 由ReactDOM.unmountComponentAtNode()触发
- componentWillUnmount()
  1
  2
  3
  4
  5
  6
  7
  8
  9
 10
 11
 12
 13
 14
 15
 16
 17
 18
 19
 20
 21
 22
 23
 24
 25
 26
 27
 28
 29
 30
 31
 32
 33
 34
 35
 36
 37
 38
 39
 40
 41
 42
 43
 44
 45
 46
 47
 48
 49
 50
 51
 52
 53
 54
 55
 56
 57
 58
 59
 60
 61
 62
 63
 64
 65
 66
 67
 68
 69
 70
 71
 72
 73
 74
 75
 76
 77
 78
 79
 80
 81
 82
 83
 84
 85
 86
 87
 88
 89
 90
 91
 92
 93
 94
 95
 96
 97
 98
 99
100
101
102
103
104
105
106
107
108
109
110
111
112
113
114
115
116
117
118
119
120
121
122
123
124
125
126
127
128
129
130
131
132
133
134
135
136
137
138
139
140
141
142
143
144
|
<script type="text/babel">
/*
		1. 初始化阶段: 由ReactDOM.render()触发---初次渲染
							1.	constructor()
							2.	componentWillMount()
							3.	render()
							4.	componentDidMount() =====> 常用
											一般在这个钩子中做一些初始化的事,例如:开启定时器、发送网络请求、订阅消息
		2. 更新阶段: 由组件内部this.setSate()或父组件render触发
							1.	shouldComponentUpdate()
							2.	componentWillUpdate()
							3.	render() =====> 必须使用的一个
							4.	componentDidUpdate()
		3. 卸载组件: 由ReactDOM.unmountComponentAtNode()触发
							1.	componentWillUnmount()  =====> 常用
											一般在这个钩子中做一些收尾的事,例如:关闭定时器、取消订阅消息
*/
//创建组件
class Count extends React.Component{

	//构造器
	constructor(props){
		console.log('Count---constructor');
		super(props)
		//初始化状态
		this.state = {count:0}
	}

	//加1按钮的回调
	add = ()=>{
		//获取原状态
		const {count} = this.state
		//更新状态
		this.setState({count:count+1})
	}

	//卸载组件按钮的回调
	death = ()=>{
		ReactDOM.unmountComponentAtNode(document.getElementById('test'))
	}

	//强制更新按钮的回调
	force = ()=>{
		this.forceUpdate()
	}

	//组件将要挂载的钩子
	componentWillMount(){
		console.log('Count---componentWillMount');
	}

	//组件挂载完毕的钩子
	componentDidMount(){
		console.log('Count---componentDidMount');
	}

	//组件将要卸载的钩子
	componentWillUnmount(){
		console.log('Count---componentWillUnmount');
	}

	//控制组件更新的“阀门”
	shouldComponentUpdate(){
		console.log('Count---shouldComponentUpdate');
		return true
	}

	//组件将要更新的钩子
	componentWillUpdate(){
		console.log('Count---componentWillUpdate');
	}

	//组件更新完毕的钩子
	componentDidUpdate(){
		console.log('Count---componentDidUpdate');
	}

	render(){
		console.log('Count---render');
		const {count} = this.state
		return(
			<div>
				<h2>当前求和为:{count}</h2>
				<button onClick={this.add}>点我+1</button>
				<button onClick={this.death}>卸载组件</button>
				<button onClick={this.force}>不更改任何状态中的数据,强制更新一下</button>
			</div>
		)
	}
}

//父组件A
class A extends React.Component{
	//初始化状态
	state = {carName:'奔驰'}

	changeCar = ()=>{
		this.setState({carName:'奥拓'})
	}

	render(){
		return(
			<div>
				<div>我是A组件</div>
				<button onClick={this.changeCar}>换车</button>
				<B carName={this.state.carName}/>
			</div>
		)
	}
}

//子组件B
class B extends React.Component{
	//组件将要接收新的props的钩子
	componentWillReceiveProps(props){
		console.log('B---componentWillReceiveProps',props);
	}

	//控制组件更新的“阀门”
	shouldComponentUpdate(){
		console.log('B---shouldComponentUpdate');
		return true
	}
	//组件将要更新的钩子
	componentWillUpdate(){
		console.log('B---componentWillUpdate');
	}

	//组件更新完毕的钩子
	componentDidUpdate(){
		console.log('B---componentDidUpdate');
	}

	render(){
		console.log('B---render');
		return(
			<div>我是B组件,接收到的车是:{this.props.carName}</div>
		)
	}
}

//渲染组件
ReactDOM.render(<Count/>,document.getElementById('test'))
</script>
|
7.2、生命周期流程图(新,17以后)
生命周期流程图
- 初始化阶段: 由ReactDOM.render()触发—初次渲染
- constructor()
- getDerivedStateFromProps(props,state):从props中得到派生的状态,也就是state的值在任何时候都取决于props时使用
- render()
- componentDidMount()
- 更新阶段: 由组件内部this.setSate()或父组件重新render触发
- getDerivedStateFromProps(props,state):从props中得到派生的状态,也就是state的值在任何时候都取决于props时使用
- shouldComponentUpdate()
- render()
- getSnapshotBeforeUpdate
- componentDidUpdate(preProps, preState):preProps和preState都是更新前的数据
- 卸载组件: 由ReactDOM.unmountComponentAtNode()触发
- componentWillUnmount()
- 若state的值在任何时候都取决于props,那么可以使用getDerivedStateFromProps
getSnapshotBeforeUpdate(prevProps, prevState) 在最近一次渲染输出(提交到 DOM 节点)之前调用。它使得组件能在发生更改之前从 DOM 中捕获一些信息(例如,滚动位置)。此生命周期方法的任何返回值将作为参数传递给 componentDidUpdate()
7.3、重要的勾子
- render:初始化渲染或更新渲染调用
- componentDidMount:开启监听, 发送ajax请求
- componentWillUnmount:做一些收尾工作, 如: 清理定时器
7.4、即将废弃的勾子
- componentWillMount
- componentWillReceiveProps
- componentWillUpdate
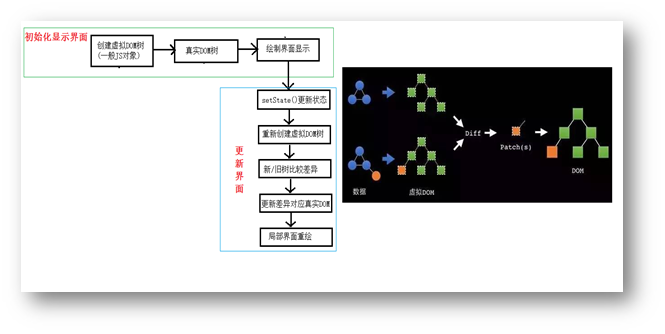
8、虚拟DOM与DOM Diffing算法
虚拟DOM与DOM Diffing算法
除特殊声明外,本博客一律使用以下协议进行授权 「
署名 - 非商业性使用 - 禁止演绎 4.0
」